ra-neus
RaNeuS
Implementation of RaNeuS: Ray-adaptive Neural Surface Reconstruction.
Features
This repository aims to provide a highly efficient while customizable boilerplate for research projects based on NeRF or NeuS.
- acceleration techniques from Instant-NGP: multiresolution hash encoding and fully fused networks by tiny-cuda-nn, occupancy grid pruning and rendering by nerfacc
- out-of-the-box multi-GPU and mixed precision training by PyTorch-Lightning
- hierarchical project layout that is designed to be easily customized and extended, flexible experiment configuration by OmegaConf
Please subscribe to #26 for our latest findings on quality improvements!
Requirements
Note:
- To utilize multiresolution hash encoding or fully fused networks provided by tiny-cuda-nn, you should have least an RTX 2080Ti, see https://github.com/NVlabs/tiny-cuda-nn#requirements for more details.
- Multi-GPU training is currently not supported on Windows (see #4).
Environments
- Install PyTorch>=1.10 here based the package management tool you used and your cuda version (older PyTorch versions may work but have not been tested)
- Install tiny-cuda-nn PyTorch extension:
pip install git+https://github.com/NVlabs/tiny-cuda-nn/#subdirectory=bindings/torch pip install -r requirements.txtCodes structure
 Three core functions are organized under the main repo as:
▾ datasets/
  __init__.py
  blender.py
  colmap.py
  colmap_utils.py
  dtu.py
  hmvs.py
  utils.py
▾ models/
  __init__.py
  base.py
  geometry.py
  nerf.py
  network_utils.py
  neus.py
  ray_utils.py
  texture.py
  utils.py
▾ systems/
  __init__.py
  base.py
  criterions.py
  nerf.py
  neus.py
  utils.py
where
▾ systemsdeploy the training by loading configurations parsed by▾ modelsfor the inference model, and▾ datasetsfor loading data with different format. Configuarations are placed under▸ configsfolder, where each single hyperparameter can be fed in terminal as well.
Run
Training on NeRF-Synthetic
Download the NeRF-Synthetic data here and put it under load/. The file structure should be like load/nerf_synthetic/lego.
Run the launch script with --train, specifying the config file, the GPU(s) to be used (GPU 0 will be used by default), and the scene name:
# train NeRF
python launch.py --config configs/nerf-blender-wbg.yaml --gpu 0 --train dataset.scene=lego tag=example

# train NeuS with mask
python launch.py --config configs/neus-blender.yaml --gpu 0 --train dataset.scene=lego tag=example
# train NeuS without mask
python launch.py --config configs/neus-blender-wbg.yaml --gpu 0 --train dataset.scene=lego tag=example
The code snapshots, checkpoints and experiment outputs are saved to exp/[name]/[tag]@[timestamp], and tensorboard logs can be found at runs/[name]/[tag]@[timestamp]. You can change any configuration in the YAML file by specifying arguments without --, for example:
python launch.py --config configs/nerf-blender.yaml --gpu 0 --train dataset.scene=lego tag=iter50k seed=0 trainer.max_steps=50000
Training on DTU
Download preprocessed DTU data provided by NeuS or IDR. In the provided config files we assume using NeuS DTU data. If you are using IDR DTU data, please set dataset.cameras_file=cameras.npz. You may also need to adjust dataset.root_dir to point to your downloaded data location.
# train NeuS on DTU without mask
python launch.py --config configs/neus-dtu.yaml --gpu 0 --train
# train NeuS on DTU with mask
python launch.py --config configs/neus-dtu-wmask.yaml --gpu 0 --train
# train NeuS on DTU with mask using tricks from Neuralangelo (experimental)
python launch.py --config configs/neuralangelo-dtu-wmask.yaml --gpu 0 --train
Notes:
- PSNR in the testing stage is meaningless, as we simply compare to pure white images in testing.
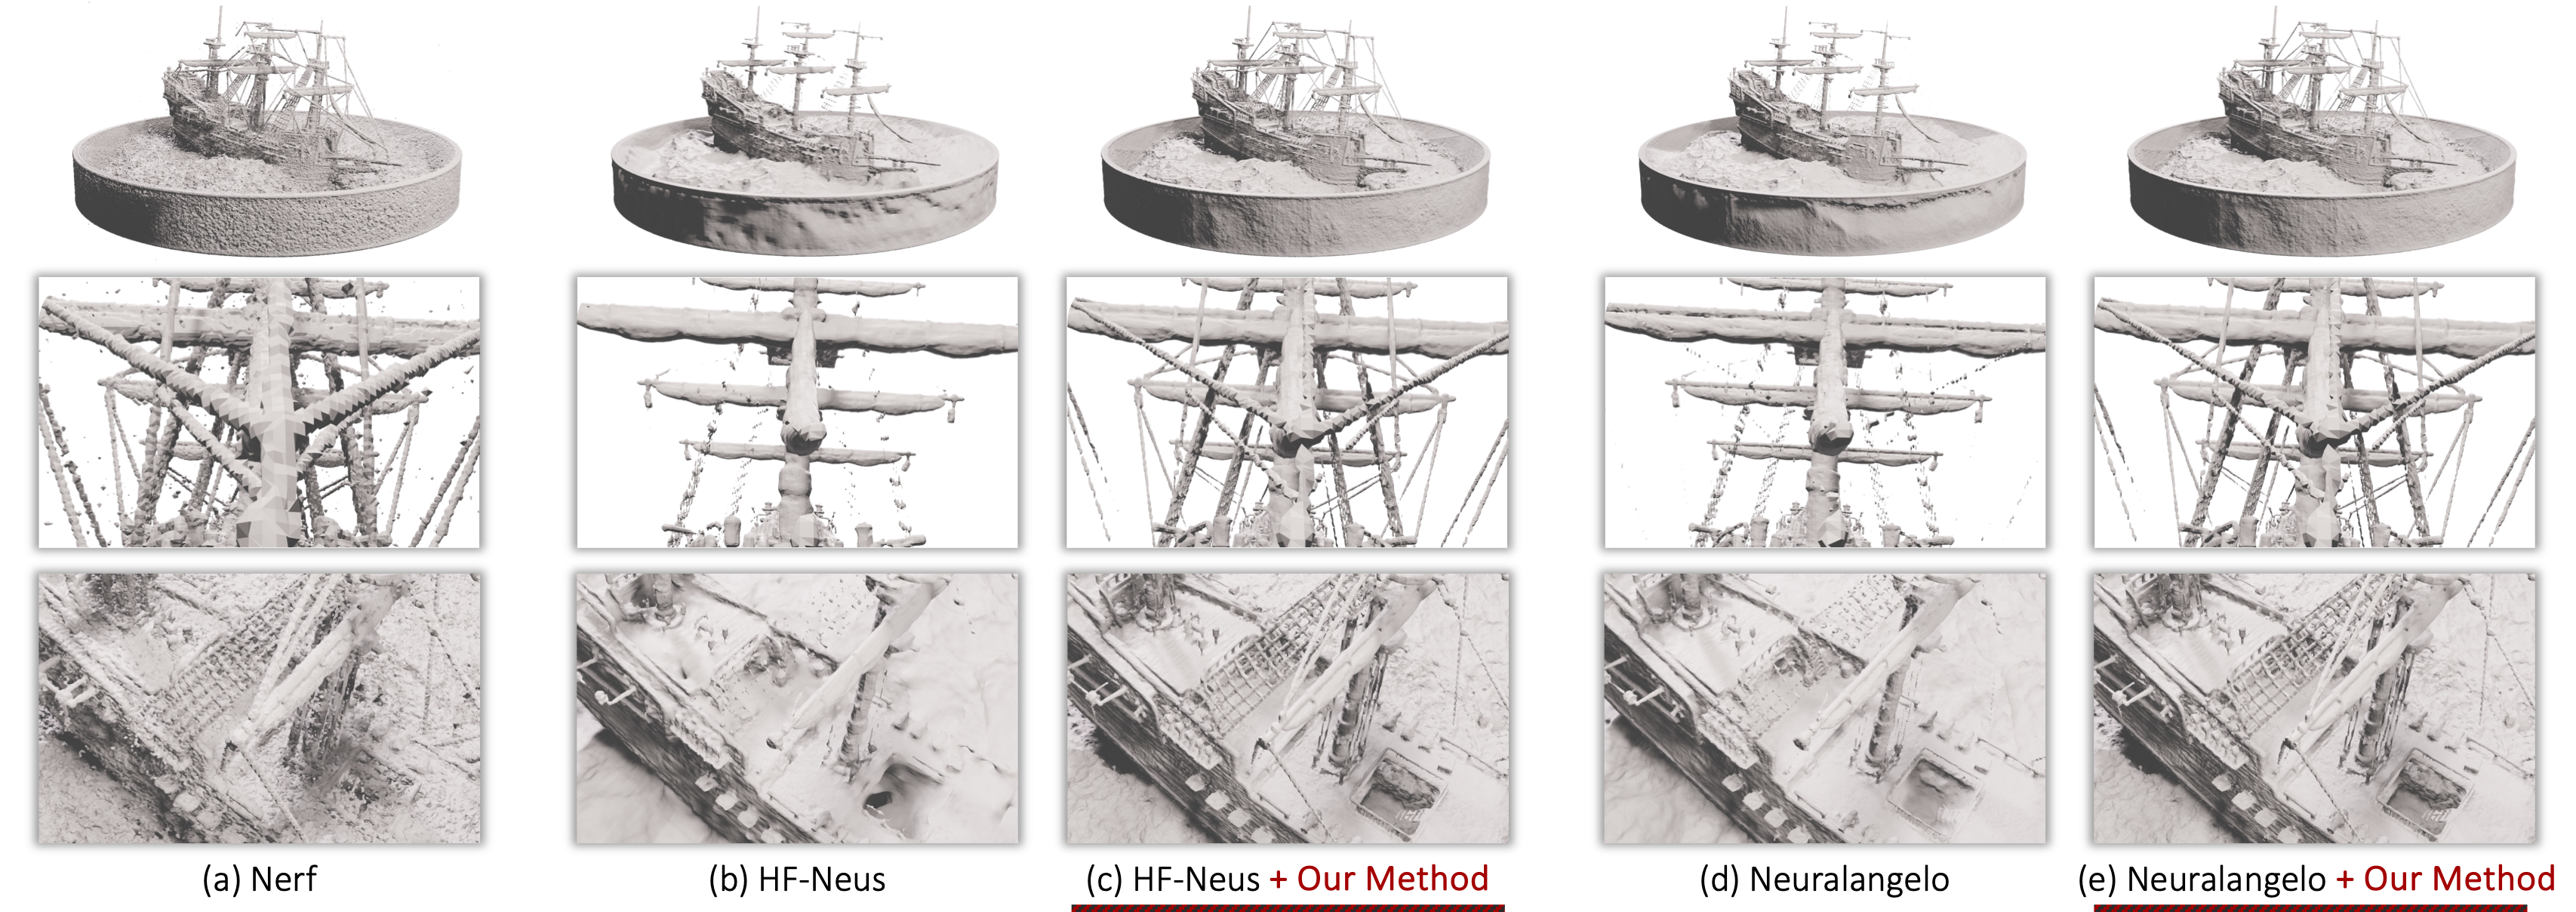
- The results of Neuralangelo can’t reach those in the original paper. Some potential improvements: more iterations; larger
system.geometry.xyz_encoding_config.update_steps; largersystem.geometry.xyz_encoding_config.n_features_per_level; largersystem.geometry.xyz_encoding_config.log2_hashmap_size; adopting curvature loss.
Training on Custom COLMAP Data
To get COLMAP data from custom images, you should have COLMAP installed (see here for installation instructions). Then put your images in the images/ folder, and run scripts/imgs2poses.py specifying the path containing the images/ folder. For example:
python scripts/imgs2poses.py ./load/bmvs_dog # images are in ./load/bmvs_dog/images
Existing data following this file structure also works as long as images are store in images/ and there is a sparse/ folder for the COLMAP output, for example the data provided by MipNeRF 360. An optional masks/ folder could be provided for object mask supervision. To train on COLMAP data, please refer to the example config files config/*-colmap.yaml. Some notes:
- Adapt the
root_dirandimg_wh(orimg_downscale) option in the config file to your data; - The scene is normalized so that cameras have a minimum distance
1.0to the center of the scene. Settingmodel.radius=1.0works in most cases. If not, try setting a smaller radius that wraps tightly to your foreground object. - There are three choices to determine the scene center:
dataset.center_est_method=camerauses the center of all camera positions as the scene center;dataset.center_est_method=lookatassumes the cameras are looking at the same point and calculates an approximate look-at point as the scene center;dataset.center_est_method=pointuses the center of all points (reconstructed by COLMAP) that are bounded by cameras as the scene center. Please choose an appropriate method according to your capture. - PSNR in the testing stage is meaningless, as we simply compare to pure white images in testing.
Testing
The training procedure are by default followed by testing, which computes metrics on test data, generates animations and exports the geometry as triangular meshes. If you want to do testing alone, just resume the pretrained model and replace --train with --test, for example:
python launch.py --config path/to/your/exp/config/parsed.yaml --resume path/to/your/exp/ckpt/epoch=0-step=20000.ckpt --gpu 0 --test
Related Projects
- ngp_pl: Great Instant-NGP implementation in PyTorch-Lightning! Background model and GUI supported.
- instant-nsr-pl: Implementation of NeRF and NeuS for neural surface reconstruction based on Instant-NGP and the Pytorch-Lightning framework.
- Instant-NSR: NeuS implementation using multiresolution hash encoding.
Citation
If you find this codebase useful, please consider citing:
@inproceedings{wang2023raneus,
  title={RaNeuS: Ray-adaptive Neural Surface Reconstruction},
  author={Wang, Yida and Tan, David and Tombari, Federico and Navab, Nassir},
  booktitle={Proceedings of the IEEE/CVF International Conference on 3D Vision},
  year={2023}
}